
Creating the Surface with Jessica
Choosing the inspiration
I’m drawn to the feral flowers. The ones with tumbling, unkempt petals that twist and overlap and refuse to fall in straight lines. I love the feel of wildness and of movement - of feeling as though you can see the flower bending in the wind, the petals swept up and over as the stems lean under the weight of sudden breeze, a moment of absolute pulsating life.
I try to draw from life as often as possible, to observe and capture the quirks and personality of certain leaves that twist against expectation or blooms that have been nibbled by insects. When I draw in my garden, I can capture the light and shadow as it naturally falls and can depict a greater sense of weight and true presence in the drawing. I {mostly} draw flowers native to Athens, not only so I can see and draw from them in-person, but because I want the drawings to have a real sense of time and place, to be rooted to a time of year and a corner of the world. Each piece is like a portrait of the South in a fleeting moment, reflected in a bloom that will never exist again, but will forever be held and remembered in clay. I find the idea of celebrating and honoring the exhuberance and joy of the impermanant the reminder I need to stay present,to stay appreciative and see the beauty in the world around me, to acknowledge the tremendous work that nature puts into a flower that might only last a single day.


Drawing & Painting the first layers
I have a little corner of the couch in my living room where you can see the impression of my body where it presses into the cushions, and you can see the perfect nest from where it has embraced me for years as I draw. When I draw in my garden, I take a blanket that Rob and I rescued from high tide at Jekyll island and spread it on the grass, using pillows to crouch on as I peer down into the world of flowers. If I am not out in my garden, I bring the garden to me, arranging leaves and branches and flowers in an apothecary’s worth of vases by my side, so I can still capture their personalities. One thing is non-negotiable, whether I am inside or out: cup after cup of coffee in my favorite mug made by Rob.
I draw directly onto the surface of the pot, cutting through the white slip to reveal the deep rich red of the clay underneath. I never sketch first with pencil, or lay out the drawing on paper and trace it. I want the energy and immediacy and flow of a line newly created, rather than the careful and restrained marks of tracing a sketch. This comes with consequences, though, as you see every mark. There is no erasing, there is no covering up. What is is what is. I have come to believe that an “incorrect” mark boldly made is infinitely more interesting than a “perfect” timid one.
Sometimes, I’ll paint the ghost of the image first, laying white highlights of underglaze on the slip to define where the light is hitting the flower before going back in to draw. Other times, I’ll do the opposite, whatever feels right in the moment. Any details like the dark pistils of coneflowers, the bold interior shapes on the petals of poppies, the pattern of butterfly wings, get painted in black underglaze watered down to various opacities and darknesses. This is also how I’ll paint branches, leaves, and the feathers of birds, using underglaze like watercolor.After establishing the outline and twist of the petals, the curve of the composition, the line of the stems and twirling of leaves, I’ll switch to a finer tool to add variation of line quality in the details and shadows.I’ll usually end up using at least 4 different width tools during this step to draw with and several different paintbrushes.


After drawing an outline of the basic shapes of these tiger lilies through white slip to reveal the red clay of this platter, I begin going in to add places where light would hit the petals. After adding a subtle wash of color for shadows, I’ll continue drawing detail lines and shading with line density.


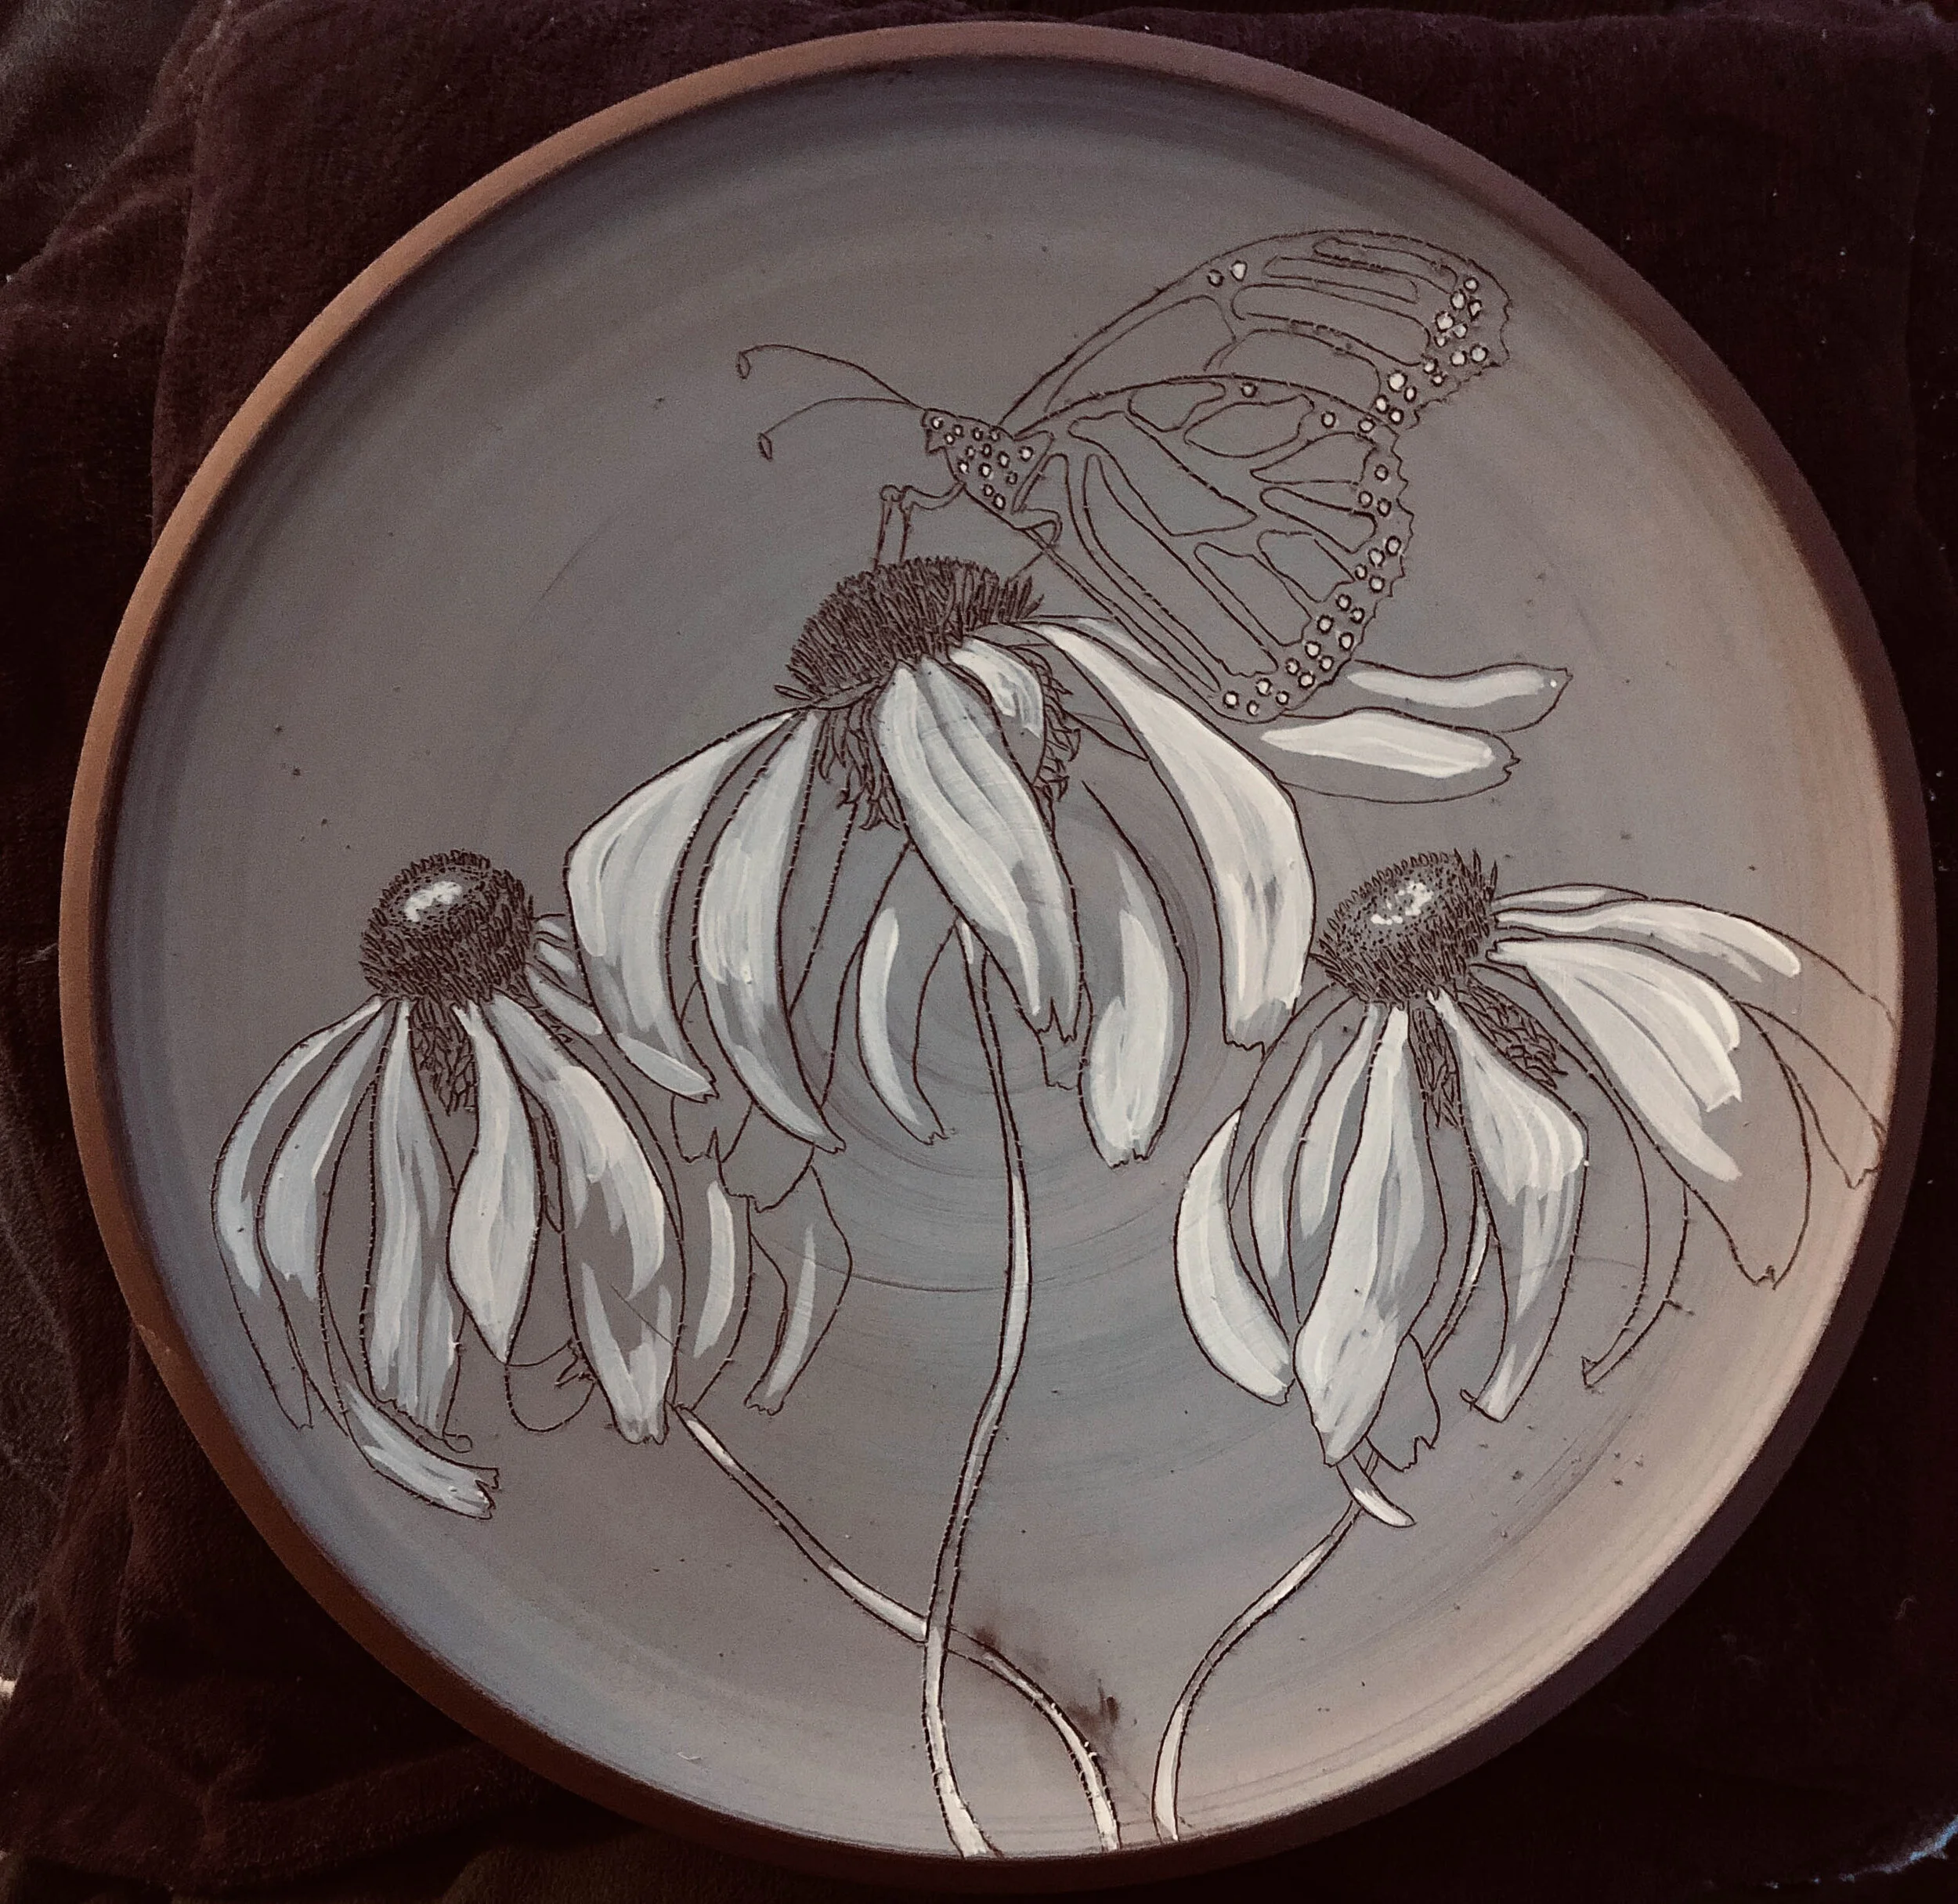
The outlines, pistals,stems and highlights have been drawn on this coneflower & monarch platter. The dark lines that you see are the red clay the has been revealed by drawing through the slipped surface. For the outline work, I primarily use the Kemper needle tool.

Watch a timelapse of the initial process of painting & drawing a koi and waterlilies vase. This is before bisque and sets me up to mishima all of the line work after the bisque firing.

This is the coneflower platter after I’ve gone back into the highlighted areas to draw lines to depict the movement of the petals and areas of shadow. For these marks, I pick up my exacto knife most often.
Sanding, Inlaying (Mishima) & Adding Depth to the image
Once the piece has been bisque fired (heated in the kiln for the first time), it’s time to move on to the finishing work. The first thing that I’ll do is hold the piece, put my hand in the handle, cradle a bowl, hold a cup. When I draw, tiny burrs of clay are kicked up from the surface. Although I brush them off, sometimes there remains a residual roughness and the only way that I can see what the user’s experience would be is to go through the motions of using it myself. I sand the handles, so that they are smooth and buttery in your hand when you’re drinking your morning coffee or tea. I’ll lightly go over my images so that any raised places are knocked down and as flush to the piece as possible, without losing all the tactile sense of process. The pieces are then ready to inlay.
All of the lines that I’ve drawn are fairly invisible up to this stage - especially when we use a white clay body like porcelain. In order to reveal the drawing, I apply a wash of black underglaze over the surface, which runs into the recesses created by the drawing. Using a sponge, I gently wipe the surface. All of the lines retain the black, and the surface is clean. Each swipe needs to be made with a totally clean sponge, or you’ll stain the surface of the clay, as well. After my lines have been inlaid, I’ll apply washes of underglaze in the shadowed areas of the drawing, softly blending them out, and trying to add depth to the piece. The final step is adding washes of burnt umber stain, to add subtle difference in the tone of shadows and to bring some warmth into the greys and blacks and whites,while holding onto a restrained and simple color palette.


A lily vase through {most} of the steps of inlaying. What I haven’t shown is the slip application/drawing/watercolor at greenware stage, sanding the piece and adding warmer-toned shadow work at the end (since this piece is headed to the wood kiln, and I only add those warm tones in the electric), but this gives you a good idea of the process and the major steps involved. I choose to inlay at the bisque stage, which is a bit unusual. I find that inlaying at the greenware stage through wax (which is the common approach) creates lines that are too crisp and perfect and even. By inlaying at the bisque stage, the clay takes on a patina in areas and I can work the wash into handle, foot and lip details to draw attention back to the form, and the image takes on a sense of almost being a charcoal drawing,rather than the stark outline that I would have achieved by inlaying through wax.
Bisqued piece with incised lines & initial watercolor from greenware stage. The vase has been sanded and is ready for inlay.
A watercolor wash of black underglaze has been applied to the drawing. The thinner consistency means it will flow into the incised lines.
After wiping away excess underglaze wash, the initial line drawing is revealed.
The underglaze wash is further cleaned up and re-applied to lines where the color might have been pulled out from the sponge.
Midtones and darker shadows are painted to create further depth to the image.
Up-close detail of lily. Since this piece will be fired in the wood kiln, the firing process will add warm tones to the painting. Now, on to glazing & firing…
“Watercolor” Painting (an alternate process)…
Every so often, I like to create a piece that is entirely from watered-down underglaze, trying to capture the feel, softness and life of watercolor painting. This is an entirely different process than the painting/sgraffito/mishima explained above. If the piece is a mixed composition of watercolor painting and inlay, I’ll paint freehand at the greenware stage. When I am only watercolor painting, I will sometimes do a light pencil outline because once I have laid the pigment down on the slipped surface, I cannot wash it off (the pigment would blend with the white slip and reveal the red clay underneath). This also gives me a chance to play with color, whether simply as a background foil for a black and white painting, or a loose and colorful experiment in painting. Underglaze behaves radically differently than traditional watercolor.It absorbs fairly instantly into the thirsty clay, not leaving you time for blending or wet work. You approach these pieces more like an oil painting, laying down layers of wash to create the desired depth and effect.

The beginning stages of a tiger lily platter. The rough outline of the flowers has been lightly sketched on the surface of the plate and the initial layers of wash are beginning to be painted in.

The finished tiger lily platter. More layers of grays and blacks have been painted and depth has been built up. You can see much more clearly in this photo that I began by painting a portion of the plate in a light green and bisque-firing it before starting my painting. I don’t particularly like to paint on bisqueware. The clay instantly absorbs the underglaze, leaving no room for play or error, and there is always a chance the painting will run after being glazed, since it has not been fixed onto the piece.

A hybrid piece. I’m more and more often drawn to marrying and mixing techniques. This goldfinch amongst the coneflowers was painted freehand without sketching at greenware, my preferred time to work in watercolor. The stems/pistils were painting in and then all the linework was drawn freehand onto the piece. This one is destined for the woodkiln and I hold my breath for days while it is firing, hoping the ash and atmosphere don’t obliterate the drawing, which happens.
Another example of the watercolor process. The blue color underglaze has been bisqued on, and the intial painting lightly mapped out.

Starting from the top, I begin working my way day, laying in the light and mid-tones first.

I’ll go back to add darker, deeper shadows as the piece progresses.

The finished iris platter.
Sgraffito & Slip Mishima
Sgraffito is the act of drawing through to the clay’s surface, usually through a contrasting slip or underglaze. While I use sgraffito in most of my work, the technique can be seen most dramatically on the black and white snake pieces below. Mishima refers to inlaying. All of my pieces have the mishima technique, but the most common and traditional way to inlay is with slip, which is a watered-down clay body. The fine line work in the examples at the top of the page require a thinner substance than slip, and that is why I use underglaze for fine-line inlaying. Slip, because it is clay in a liquid form, has more body and fills wider spaces. In the heron plates below, the background design is a traditional Japanese flower stamp, whose impression has been filled with slip and then methodically scraped away at leather-hard.The cranes themselves are painting with white underglaze, which was then drawn through and inlayed with black underglaze.

Snakes painted at greenware with black underglaze on white stoneware clay. Once the underglaze has dried, I use a Kemper needle tool, an exacto knife and a machinist’s scribe to draw out the scale design.

The background of all the crane plates was created by using a traditional Japanese floral stamp, the size of an eraser head. After pressing the stamp into the wet clay, I painted over the design with white slip. Once dry, I used a trim tool to scrape back the slip on each flower.


All of these crane plates were created by first painting the crane and the grass/fish/cattails in white underglaze, covering that in wax, drawing the detail lines through the wax and inlaying in black all at a soft leatherhard state. I chose to inlay through wax in this instance because if I attempted to inlay at bisque, all the floral impressions that serve as the background would be filled & covered.

Another example of sgraffito on its own. As with the other snake vessels, this large vase was first painted with 6 coats of black underglaze, watered down to the consistency of skim milk, so that the layers were thin enough to not flake. Once dry, the same tools (needle tool, exacto knife and mechanist’s scribe) were used to create the pattern. Any and all mistakes are plainly seen when working this way.